

The much anticipated (by two people) bonnet tutorial is here! Everything you will need to make your own adorable newborn(ish) bonnet is below.


Materials:
- Bonnet Pattern in size 0-3 months (updated as of 7/1/12!) can be downloaded for free here!
- 2 fat quarters of fabric
- lightweight fusible interfacing
- 2 buttons

What you do:
1. Cut out the pattern.
Iron your fabric and then fold each in half, right sides in. Lay the pieces on top of each other with your folds lined up. Pin your pattern through both fabrics and cut. Seam allowances are included, so cut right on the line. Fold a piece of interfacing and cut one pattern piece from that, too. You should have three pattern pieces now.

2. Make the straps.
Choose which fabric you want your straps to be. Cut two straps from your scraps, 2.5" x 15" (length and width isn't super important, so if you only have enough for 2.25" x 13" strips, go with it. Mine ended up being longer, more like 17").


Take it to your sewing machine and stitch 1/4" around one short edge (I made mine with a point to make it a little fancier) and the long edge.


Leave one short edge open. Trim your corner if you did a point on your short edge.


Iron and set aside.
3. Assemble the bonnet.
First, iron your interfacing according to the package directions onto the wrong side of one of your fabric pattern pieces. Next, lay one bonnet piece, right side up, on your work surface. Place the other piece, right side down, on top.

Place your straps inside on the straight edge, with the short edge you didn't sew sticking out the side (I fold my straps accordion-style so they are not in the way when I sew). Pin in place.


Pin all around. Pins are your friends. Take your bonnet to the sewing machine and sew 1/4" from edge, all the way around, leaving a two inch gap at the back, between the straps. Be careful not to stitch the folded straps!

Turn right side out and iron (press your open edges inside the bonnet). You may be wondering at this point if it is ever going to look like a bonnet. It will, even though it now resembles a jellyfish.

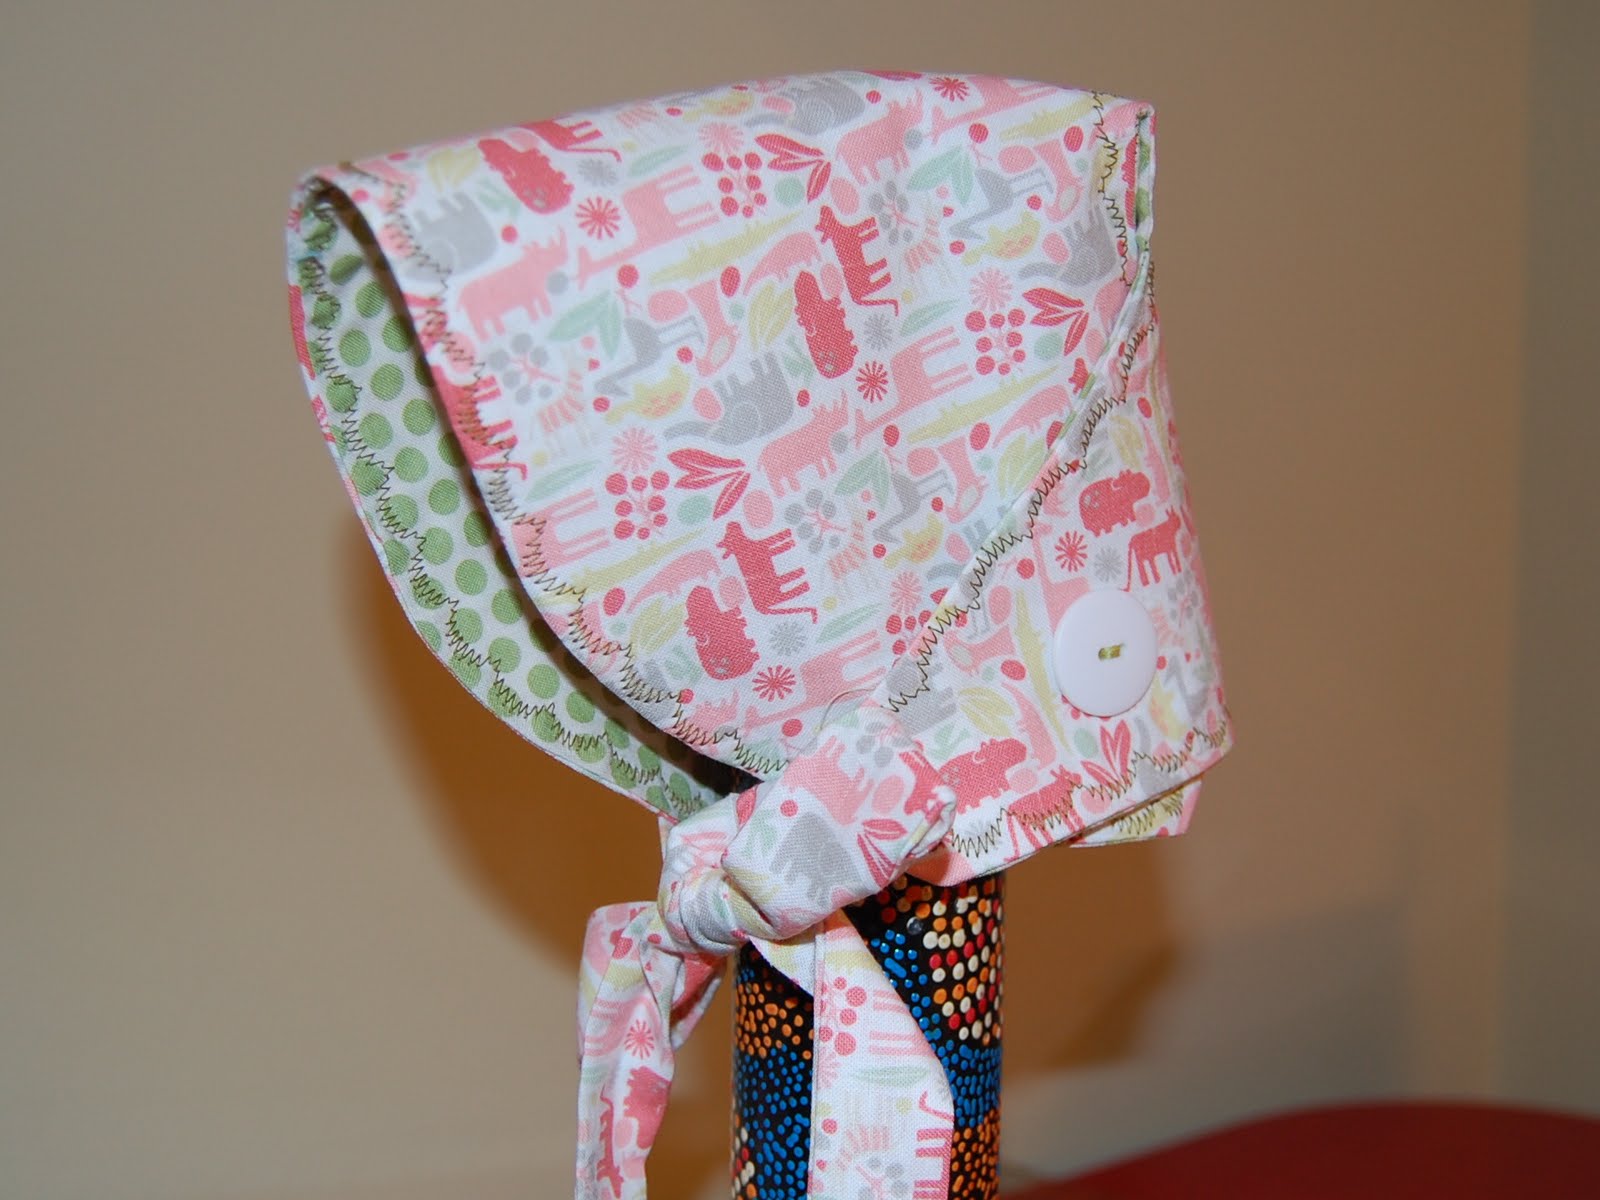
4. Finish her off.
I like to use my sewing machine's fancy stitches to topstitch all around the bonnet. You could use just a straight stitch, too. Contrasting thread makes it even cuter!

Topstitching will close up the gap you left to turn your bonnet right-side out. Once you have it all topstitched the way you want, it is time to turn it from jellyfish to bonnet! Pull the back sides forward onto the curved edge and pin.

You are going to be sewing your buttons here. Sometimes it takes a little tinkering to get it *just right*.


Sew your buttons on (sew them firmly so no babies can pull them off, please!) and find a cute model, or a didgeridoo if your cute model is sleeping.
Notes:
- If you want to make a larger size, just add an inch or two around the outside edges of the bonnet. I have a 6-12 month pattern worked out, but it would require a scanner or something to get it onto my computer because it is bigger than one piece of paper. I am not that fancy, so you will have to work it out yourself.
- You could also make a button hole for your buttons, but that's more complicated.
- If you use a heavier fabric for one side, like corduroy or canvas, you can skip the interfacing. I only use interfacing for cottons.
- Right...so if you want to make these and sell them, that's okay! But give me some credit, mmkay? And please don't pretend this is your pattern, because it isn't. Let's play nice, now. :)
There it is, my first tutorial. If anything is unclear, let me know. Happy sewing to you all.
This just makes me smile!! Great job!!
ReplyDeleteaww. That is so adorable. Good job! http://caribbeanmissionarywife.blogspot.com/
ReplyDeleteWhat an adorable bonnet. Great tutorial as well. Thank you. We're expecting our 2nd grandchild very soon but this one is a boy. I don't think the Momma is going to use this if I were to make it sadly or I'd be doing that this weekend. Super cute.
ReplyDeletegonna be making 3 for my 3 girls. 7 5 and 1. I will blog and post a link!!
ReplyDeletethanx!
Kathryn
this is adorable but hard without a machine.
ReplyDeletecute
ReplyDeleteWas anyone able to come up with good measurements for a 1 yr size? I'd love to make some of these but I just can't get the size right, they're so adorable!
ReplyDeleteReally nice job on the tutorial and YUMMY design. I just adore it!
ReplyDeleteKeep up the wonderful work.
I love the look of this bonnet and would love to make one for my daughter. However, she will be 20 - 24 months this summer so it would need to be much much bigger. I haven't sewed in 15 years so I really have no clue how I would go about making it that much bigger. Any suggestions? Thanks! :)
ReplyDeleteHi, Abby. I do have it patterned out in larger sizes, but unfortunately I have none of the patterns available online at this time. Sorry about that!
DeleteKristy, You are a fantastic lady! Thank you for sharing! We have a couple new babies at church and I will be making these - and honeslty - it looks so cool, I want to figure out one for me! Thank you so so much! What a great Spring time gift! Thank you!
ReplyDeleteperfect timing !
ReplyDeletea sweet baby girl is expected soon for a couple who have awaited her arrival for many YEARS ! LOL this will make a very cute addition to her gifts from us
Thanks SO much for sharing.
I forgot to say. I have an old pattern for a clothes pin apron that converts to a bonnet..
ReplyDeletedd won a blue ribbon on hers at the fair :-)
This bonnet is adorable...can't wait to sew one up. I am nervous about putting a button on. I think velcro or maybe a felt flower might be safer for baby.
ReplyDeleteHi, I am unable to find a link to contact you. I love these adorable bonnets, and would like to make them to sell. I make many sewn items, all from recycled fabrics and buttons, to sell at two crafter's markets. I'd like to make a computer printed tag to attach to each bonnet to give you credit. I want to know how you'd like the tag to be worded. Could you please contact me at creative.reruns@rocketmail.com? Thanks so much!
ReplyDeleteThis is a really great hat. I would love to make them for my niece's daughters to match their Easter dresses--8 years, 7 years, and 3 years. I've requested mesurements for them...any chance you have developed patterns for these sizes?
ReplyDeleteThis is a clever bonnet--it can be all different looks depending on the fabric. I would like to make them for my niece's daughters, ages 8, 7, and 3 1/2. Have you sized them up? Thanks.
ReplyDeleteI just finished the bonnet! I posted a link from my facebook to here. It turned out so very cute and was simple enough that I finished it in an hour or so, right before we went to the fair on a hot, sunny day.
ReplyDeleteI made one today, awesome tutorial and the hat was really adorable!
ReplyDeleteThis comment has been removed by the author.
ReplyDeleteAbsolutely adorable! I have a new granddaughter, so I will be making plenty of these! Thank you for sharing!
ReplyDeleteMade it and getting ready to make another to match the two dresses I made. Great job on the tutorial love the pattern. Thank you.
ReplyDeleteThank you for this! I am going to attempt for my two little girlies :) I appreciate you!
ReplyDeleteMade one for my baby..sooo cute..thank you for sharing the pattern��
ReplyDelete